
How to Lay a Gravel Driveway That Suits Your Site
A short driveway can still be a poor DIY project if it crosses saturated soil, requires retaining work, or collects concentrated runoff.
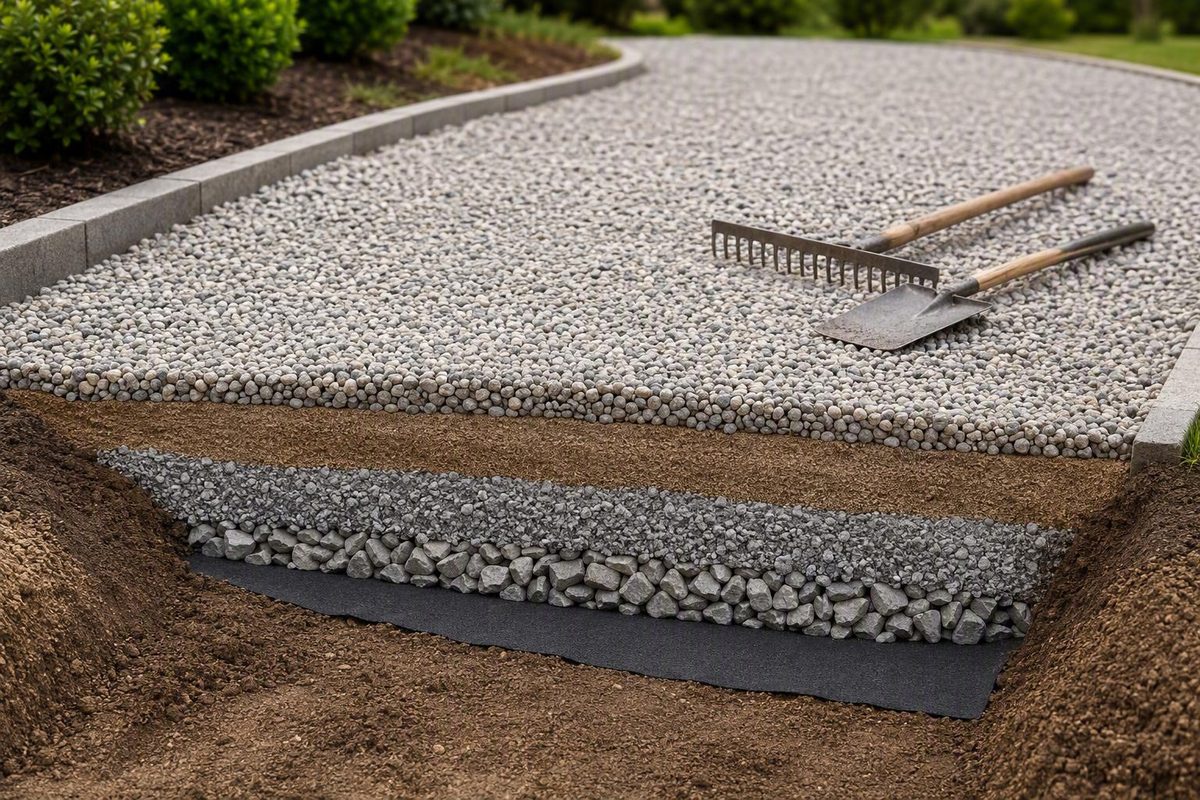
Learning how to lay a gravel driveway is less about spreading attractive stone than building a compacted, well-drained structure beneath it. The basic sequence is:
- Plan and mark the route.
- Locate utilities and check local requirements.
- Remove organic and unstable material.
- Shape the subgrade so water has a safe outlet.
- Install separation geotextile where site conditions justify it.
- Place and compact structural aggregate in lifts.
- Add a controlled wearing course.
- Complete final grading and inspect the driveway after rain.
The correct design depends on subgrade strength, groundwater, rainfall, freeze-thaw exposure, driveway grade, traffic frequency, and the heaviest vehicle expected. Treat the dimensions in this guide as adaptable residential starting points, not a site-specific engineering design.
Start With the Site, Not the Gravel
Before selecting stone, decide whether the site is suitable for a straightforward DIY installation.
Examine the ground rather than judging only the existing surface. Soil that appears firm in dry weather may soften after sustained rain. Clay can retain water, loose fill can settle, and organic soil changes as roots and other material decompose. A driveway excavated into a hillside may also intercept runoff that previously traveled elsewhere.
If possible, walk the proposed route during wet weather and inspect it immediately after a storm. Look for ponding, seepage, yielding soil, erosion, and established flow paths.
Design for the controlling vehicle load, not merely the passenger car used each day. Consider whether the driveway must carry:
- Aggregate delivery trucks
- Refuse and recycling trucks
- Heating-fuel or septic-service vehicles
- Moving vans and construction vehicles
- Fire or other emergency vehicles
- Trailers and tow vehicles
- Tractors or agricultural equipment
- Snowplows and other snow-removal equipment
These vehicles may be wider, heavier, and less maneuverable than a car. Their wheels may also load the driveway edge while turning through a gate or following a curve. Contractor and community guidance both emphasize accounting for service and delivery vehicles rather than designing only around routine household traffic (Patriot Excavating).
Evaluate six conditions before choosing a construction method:
- Subgrade: Is the exposed soil firm, or does it deform or pump under pressure?
- Water: Is there standing water, shallow groundwater, seepage, or runoff crossing the route?
- Climate: Will the driveway experience sustained rain or repeated freeze-thaw cycles?
- Slope: Will water accelerate down the driveway or enter from higher ground?
- Traffic: How frequently will vehicles use it, and where will they brake or turn?
- Loads: What is the heaviest delivery, service, or emergency vehicle likely to enter?
A long, level driveway on firm, freely draining ground may be manageable with rented equipment. A short driveway can still be a poor DIY project if it crosses saturated soil, requires retaining work, or collects concentrated runoff.
Stop excavation and obtain local professional advice if you encounter:
- Soil that remains soft, pumps water, or deflects deeply
- Groundwater or persistent seepage in the excavation
- A steep or visibly erosion-prone grade
- A substantial cut into a hillside
- A need for retaining walls or slope stabilization
- Runoff concentrated from a large uphill area
- A culvert that must be selected, sized, or approved
- Ground that construction equipment cannot cross without severe rutting
The objective is not to eliminate every difficult condition. It is to recognize when general residential guidance is no longer adequate.
Check Utilities, Rules, Dimensions, and Access
Contact the applicable utility-location service before excavation. Ask what the service marks, how much notice it requires, how long markings remain valid, and whether you must arrange separate identification of privately installed services. A published DIY installation account also identifies utility locating as a required pre-excavation step, although the exact procedure depends on the jurisdiction (Instructables).
Independently ask the appropriate local authorities whether the project is subject to:
- Excavation or construction permits
- Driveway-entrance or curb-cut approval
- Public-road connection requirements
- Sight-distance restrictions
- Roadside-ditch or culvert requirements
- Stormwater or erosion-control rules
- Restrictions on loose-surface or permeable driveways
- Homeowners association requirements
Do not assume that utility marking constitutes permission to excavate or connect to a public road. A contractor installation guide, for example, treats utility coordination and permitting as separate planning stages and notes that public-road connections can trigger additional requirements (Patriot Excavating).
Mark and test the route
Mark both driveway edges with stakes and string or ground-marking paint. Walk the alignment and, where practical, drive it before excavation.
Check for:
- Buildings, porches, steps, and foundations
- Trees and root zones
- Fences, gateposts, and gate swing
- Tight curves and inside-wheel tracking
- Low branches and overhead utility lines
- Eaves and other projections
- Blind approaches and poor road sight lines
- Space to open vehicle doors
- Garage-door and threshold elevations
- Room for delivery trucks, trailers, and plows
Approximately 10 feet or 3 metres is a commonly published starting width for single-vehicle access, not a universal minimum. One supplier guide specifies 3 metres for one vehicle and recommends additional width at curves and turning areas; local access rules and larger vehicles may require more (Daisy’s Garden Supplies).
Allow additional space where vehicles must pass, where a truck turns through a gate, or where drivers need to park without obstructing the travel lane. If backing onto the road would be unsafe, include a turnaround sized for the vehicles that must use it and any applicable access requirements.
Plan machinery and material movement
Decide how the project will operate before ordering aggregate:
- Can delivery trucks reach a safe unloading point without crossing weak ground?
- Can loads arrive and unload in construction order?
- Is there a firm stockpile area that will not obstruct later work?
- Can the selected excavator, loader, tractor, compactor, or roller enter and turn?
- Where will excavated soil and old material go?
- What property features must be protected during equipment movement?
Ask the aggregate supplier whether delivery includes spreading or only unloading at an accessible location. Confirm vehicle size, clearance needs, unloading limitations, and the condition of the access route. Plan lawful disposal or permitted on-site reuse of excavated material before work begins rather than improvising after spoil has accumulated.
Establish elevations
Use marked stakes, string lines, a builder’s level, or a laser level to record:
- Existing ground elevation
- Planned excavation depth
- Finished elevation
- Crown or cross-slope
- Garage and road transitions
- Drainage direction
Keep at least one elevation reference outside the excavation so machinery cannot remove it. Measure across the width as well as along the centerline. Centerline measurements alone can conceal low edges, inconsistent depth, or a reverse slope.
Design the Drainage Before Excavating
Water is a major contributor to rutting, potholes, aggregate migration, and washouts. Standing water can soften susceptible subgrade. Runoff traveling along wheel tracks can displace surface material, while concentrated cross-flow may cut through the complete driveway assembly.
Each overlying layer should reproduce the intended shape. Surface stone may temporarily conceal a flat or incorrectly pitched foundation, but it cannot reliably correct it.
Crown versus one-way cross-slope
A crowned driveway is higher near the center and falls toward both sides. It can work where each edge has a suitable route for runoff.
A one-way cross-slope falls from one edge to the other. It may be appropriate when runoff should discharge to only one side and that side has a stable, lawful outlet.
Neither arrangement is universally better. Choose according to:
- Natural topography
- Buildings and foundations
- Road and shoulder elevations
- Neighboring property
- Soil erodibility
- Ditches or swales
- Incoming runoff
- Outlet location and capacity
Do not copy a numerical slope from an unrelated project. Driveway length, terrain, surface material, outlet capacity, and transition geometry all affect whether a particular grade is suitable.
Use string lines, marked stakes, a builder’s level, or a laser to confirm that water will move away from garages and foundations. Check both the cross-section and the driveway’s length. A well-formed crown will not prevent ponding in a longitudinal sag.
Control water before it reaches the driveway
A driveway cut into a hillside can become the lowest channel in the surrounding ground. Water may enter from the uphill cut and run along the travel lane unless it is intercepted first. Community experience with hillside driveways repeatedly identifies uphill drainage as a central concern (Sawmill Creek Woodworking Community).
Possible measures include:
- Shallow vegetated swales
- Uphill interceptor ditches
- French drains for suitable subsurface-water conditions
- Culverts where a defined channel crosses the entrance
- Stable berms or ditch checks
- Stone armoring at erosion-prone outlets
- Measures that disperse flow rather than concentrating it
These features are not interchangeable. A French drain is not a substitute for every surface ditch, and a culvert should not be selected merely by matching an existing pipe. Concentrated flows, public-road drainage, and culvert installations may require local approval and site-specific design.
Perform a preconstruction water test
Before aggregate delivery, inspect the property during or immediately after rain. Mark:
- Ponded areas
- Wet or yielding soil
- Natural flow paths
- Water entering from uphill land
- Roof, yard, or road runoff
- Eroded channels
- Existing outlets
Resolve where the water will go before building the driveway. The outlet should not direct runoff toward a building, across public pavement, onto neighboring property, or onto unprotected erodible ground.
Choose the Layer Assembly and Gravel by Function
A conventional gravel driveway is a layered system. Not every project needs every possible component, but each included layer should have a defined purpose.
From bottom to top:
- Prepared subgrade: Shaped natural soil or suitable compacted fill supporting the assembly.
- Optional separation geotextile: Limits mixing between susceptible soil and aggregate.
- Structural sub-base or base: Distributes vehicle loads and supplies most structural support.
- Optional transition layer: Bridges coarse base material and a finer surface.
- Wearing course: Provides the final driving surface and drainage profile.
The compacted structural aggregate matters more than decorative top stone. Attractive gravel cannot compensate for saturated soil, inadequate base depth, deep loose fill, or poor compaction.
Buy aggregate by specification and purpose
Aggregate names vary by region. Instead of ordering solely by a familiar label, describe what the material must do.
For the structural layer, ask for:
- Angular, durable crushed aggregate
- Suitability for a compacted residential driveway base
- Gradation compatible with the planned lift thickness
- Information about fines content
- Supplier guidance on moisture and compaction
- Suitability for the expected vehicles and local subgrade
Terms such as road base, crusher run, dense-graded aggregate, MOT Type 1, No. 304, and No. 411 can refer to compactable mixtures containing larger particles and fines. Labels such as No. 3 and No. 57 may describe coarser or cleaner stone. Actual particle sizes, fines content, durability, and specifications vary by supplier and region.
Angular crushed particles generally interlock more effectively under vehicle traffic than rounded decorative gravel. Rounded stone may remain mobile during braking, turning, or plowing, particularly when installed deeply or on a slope. Use it only where migration, containment, and traction have been considered.
Understand the permeability trade-off
Dense-graded aggregate contains smaller particles and fines that fill voids, helping it form a tight layer when properly compacted. Those fines also reduce the free passage of water compared with clean, open-graded stone. Supplier guidance on sub-bases describes this trade-off when comparing compactable fines-rich material with more freely draining aggregate (Beauxfort).
Clean, open-graded aggregate allows more water to move through its voids, but it may not produce the same tight wearing surface.
“Permeable” does not mean drainage can be ignored. Water entering the driveway still needs an outlet. If it reaches impermeable clay or remains trapped in the excavation, it can saturate the supporting soil.
How deep should the assembly be?
Published residential recommendations differ substantially. One supplier guide describes 100–150 millimetres of total construction (Daisy’s Garden Supplies), while a contractor guide describes 8–12 inches of excavation, adjusted for soil, drainage, and traffic.
These are divergent starting points, not a blended standard. They reflect different soils, climates, materials, traffic assumptions, and regional construction practices.
Use the following questions to develop a preliminary design with a local quarry or contractor:
- Is the subgrade firm, soft, clay-rich, filled, or frost-susceptible?
- Will groundwater or seasonal saturation reach the excavation?
- How often will heavy vehicles use the driveway?
- Is the route level, curved, or steep?
- Is the selected base dense-graded or open-graded?
- Will the driveway be plowed?
- What lift thickness can the available compactor handle?
- Do local access requirements specify construction details?
Soft ground, clay, freeze-thaw exposure, frequent traffic, and heavy vehicles may justify a more robust assembly. The available guidance does not establish one universal depth for those conditions.
Keep the wearing course relatively thin. Supplier examples describe surface layers of approximately 2–3 inches, while another published assembly calls for at least 50 millimetres of topping; the correct compacted or loose placement depth depends on the selected material and complete assembly (Gravelshop).
Edging and stabilization grids are optional, problem-specific upgrades. Edging can help contain gravel at vulnerable boundaries. A grid may reduce migration when installed as part of an assembly designed for that product. Neither replaces stable subgrade, drainage, structural aggregate, and compaction.
Calculate Materials and Organize the Equipment
Calculate each layer separately using its intended compacted dimensions:
Volume = length × width × compacted depth
When measuring in feet:
- Convert depth from inches to feet.
- Multiply length by width by depth to obtain cubic feet.
- Divide cubic feet by 27 to obtain cubic yards.
For metric measurements, multiply length, width, and compacted depth in metres to obtain cubic metres. The cubic-yard conversion and layer-volume method are also set out in this DIY installation example (Instructables).
Worked example
Assume a hypothetical driveway with these dimensions:
- Length: 60 feet
- Width: 10 feet
- Compacted structural base: 6 inches
- Compacted wearing course: 2 inches
Structural base
- Depth: 6 ÷ 12 = 0.5 feet
- Volume: 60 × 10 × 0.5 = 300 cubic feet
- Cubic yards: 300 ÷ 27 = 11.11 cubic yards
Wearing course
- Depth: 2 ÷ 12 = approximately 0.1667 feet
- Volume: 60 × 10 × 0.1667 = approximately 100 cubic feet
- Cubic yards: 100 ÷ 27 = approximately 3.70 cubic yards
The hypothetical compacted requirement is therefore approximately 11.11 cubic yards of structural base and 3.70 cubic yards of wearing-course material. Do not combine the quantities unless the layers genuinely use the same product for the same function.
Calculated compacted volume is not automatically the correct delivered volume or tonnage. Aggregate density varies with rock type, gradation, fines, and moisture, while loose material consolidates during placement.
Give the quarry:
- Driveway length and width
- Compacted depth of each layer
- Selected products
- Expected vehicle loads
- Delivery and spreading requirements
Ask the supplier to convert the compacted volume using product-specific bulk-density and compaction information. Discuss irregular excavation, consolidation, spillage, and material reserved for later repairs rather than applying a universal overage percentage.
Layout and hand tools
Have the necessary tools ready before delivery:
- Stakes and string or marking paint
- Tape measure
- Shovels and digging tools
- Landscape and grading rakes
- Wheelbarrow
- Straight board or straightedge
- Builder’s level, laser, or another elevation-checking tool
- Broom for cleaning adjacent pavement
- A supplier-approved water source if moisture adjustment is appropriate
Powered equipment
Match equipment to the work:
- Excavator: Stripping, deeper excavation, ditch work, and loading spoil
- Skid steer or compact track loader: Moving stockpiles, spreading, and grading
- Tractor with grading attachment: Redistributing aggregate and maintaining long drives
- Vibrating plate compactor: Modest areas and compatible thin lifts
- Drum roller: Long drives, large areas, coarse layers, or heavier-duty construction
Check the machine specifications and confirm compatibility with the aggregate supplier. On long drives, repeated plate-compactor passes may make a roller or contractor more practical.
Delivery, spoil, and work-area controls
Schedule loads in construction order and keep stockpiles from mixing with soil. Identify the intended destination for sod, topsoil, old gravel, asphalt fragments, rubble, and unsuitable soil before excavation.
Do not bury questionable debris beneath the driveway merely to avoid removal. Confirm any disposal or on-site reuse requirements with the applicable local authority.
Use eye protection, hearing protection, and gloves during compaction, as described in the cited DIY installation account. Follow the operating and protective-equipment instructions supplied with rented or owned machinery. Keep the active work area controlled so truck unloading, reversing, and compaction are not obstructed.
Prepare the Subgrade and Install Fabric Where Needed
Strip grass, roots, organic topsoil, old loose material, and visibly unstable soil. Organic material is not a dependable structural foundation because it changes as roots and other matter decay.
Do not assume an existing dirt, rubble, asphalt, or gravel surface is an adequate base. Investigate:
- Soft areas beneath the existing surface
- Buried construction debris
- Contaminated or mixed material
- Loose asphalt fragments
- Deep, poorly compacted fill
- Areas where old aggregate has mixed into the soil
- Depressions that remain wet
Make that decision after inspection rather than for convenience.
Excavate to the drainage design
Excavate to the marked elevations while preserving the planned crown or cross-slope. Measure frequently from reference points outside the work area. Do not dig a flat-bottomed trench and expect the wearing course to create all the drainage.
Avoid unnecessary over-excavation of firm subgrade. If elevation must be restored, place suitable fill in shallow, compacted lifts.
If an area becomes unexpectedly soft, do not automatically excavate deeper. Determine whether the cause is organic soil, unsuitable fill, seepage, groundwater, or concentrated runoff.
Decide whether separation geotextile is justified
A properly selected separation geotextile can limit mixing between aggregate and clay or unstable soil. It may also reduce mud pumping through the base.
Fabric does not:
- Drain the site by itself
- Make saturated ground structurally sound
- Replace adequate structural aggregate
- Eliminate the need for compaction
- Correct an unsuitable outlet
- Prevent all weeds
Weed suppression is secondary and incomplete because sediment and organic material can accumulate above the fabric, allowing weeds to establish at the surface.
Ask for a product recommendation compatible with:
- Subgrade conditions
- Aggregate size and gradation
- Installation equipment
- Expected vehicle loads
- The intended drainage arrangement
The available guidance does not support one universal fabric class, overlap, or anchoring detail. Installation recommendations should come from the selected product’s supplier or manufacturer.
Place the fabric over the prepared subgrade before soil contaminates the aggregate. Install it carefully, minimize wrinkles and damage, and follow the product instructions for overlaps, anchoring, aggregate cover, and equipment movement.
Install planned drainage features, transitions, edging, or grids at the stage required by the selected assembly. Edging is optional, but where used it should be integrated with the base rather than treated as a substitute for structural support.
Stop and obtain professional input if the exposed ground pumps, deflects deeply, stays saturated, reveals groundwater, or cannot support construction equipment without severe rutting.
Place, Grade, and Compact the Aggregate in Lifts
Once the subgrade is prepared and drainage features are ready, build the driveway from the bottom up.
1. Schedule aggregate in layer order
Confirm which material arrives first, where it will unload, and whether the truck can reach the staging area without damaging the prepared subgrade or fabric.
If trucks cannot safely enter the prepared area, unload on stable ground and move the material with suitable equipment. Spread enough cover before allowing machinery over fabric, following the fabric supplier’s installation requirements.
2. Spread the first structural lift
Distribute the base aggregate evenly instead of creating isolated piles that are difficult to grade. Use elevation stakes, string, a laser, or measured checks from a fixed reference to verify:
- Loose placement thickness
- Intended compacted elevation
- Edge elevation
- Crown or cross-slope
- Longitudinal drainage
- Road, gate, and garage transitions
Supplier guidance commonly describes base placement in approximately 3–4-inch lifts where the aggregate and equipment are compatible (Gravelshop). Treat that figure as a practical loose-placement starting point, not a universal compacted thickness. Particle size, gradation, machine capability, and supplier instructions govern the permissible lift.
Placing the full base depth at once can compact the upper portion while leaving lower material loose. The surface may appear complete even though traffic is still consolidating the foundation.
3. Adjust moisture only when appropriate
Some dry, fines-containing aggregates handle and compact better at a suitable moisture condition. That does not mean every layer should be soaked.
Ask the quarry whether the selected material should be compacted dry, lightly moistened, or at another condition.
4. Compact systematically
Operate the compactor according to its instructions. Make orderly, overlapping passes along the driveway rather than compacting only the future wheel tracks.
Cover the full width, including:
- Center and sides
- Edges
- Curves
- Gate approaches
- Garage transitions
- Road tie-ins
- Braking and turning areas
Preserve the intended profile while compacting.
A vibrating plate compactor is commonly used for modest residential work and compatible thin lifts.
5. Inspect every completed lift
After compaction, recheck:
- Compacted layer depth
- Crown or cross-slope
- Low spots
- Soft or moving areas
- Edge support
- Drainage direction
- Transition elevations
Correct errors before burying them beneath another layer.
Reduced stone movement, fewer visible ridges, and a firm-feeling surface are useful observations. They do not prove that a specified compaction density has been achieved. Projects requiring documented density need an appropriate specification and test method.
6. Repeat for remaining structural layers
If the design includes multiple structural lifts, repeat the sequence:
- Spread.
- Adjust moisture if appropriate.
- Grade.
- Compact.
- Inspect.
If a transition layer is included, install it only after confirming that the underlying base is stable and correctly graded. A transition layer bridges coarse and fine materials; it should not conceal a defective foundation.
7. Apply the wearing course
Spread the wearing material to its planned, controlled depth. Grade it evenly while preserving the crown or cross-slope, then compact it as appropriate for the product.
Do not leave a deep loose layer merely because extra material was delivered. Excess surface gravel can move beneath braking and turning tires. If practical, stockpile a modest quantity for later repairs instead.
8. Finish the transitions
Inspect each interface:
- Garage: Water should move away from the slab and building.
- Gate: Finished height should not obstruct operation.
- Road: Loose aggregate should not migrate onto public pavement.
- Shoulder or ditch: Runoff should reach the intended outlet without cutting a channel.
- Edging: The boundary should contain material without trapping water.
Remove loose aggregate from adjacent public pavement and confirm that runoff can reach the intended outlet.
Prevent and Repair Ruts, Potholes, and Washouts
A gravel driveway is maintainable, not maintenance-free. Periodic regrading, drainage clearing, localized repair, and eventual wearing-course replenishment are normal.
Look for:
- Blocked ditches or edges
- Standing water
- Exposed or torn fabric
- Displaced surface gravel
- Wheel-track depressions
- Loss of crown or cross-slope
- Erosion at outlets
- Mud pumping through aggregate
- Loose gravel on adjacent roads
- Snowplow damage
| Symptom | Likely contributing causes | Appropriate response |
|---|---|---|
| Mud pumping through aggregate | Soil mixing, saturation, weak subgrade, or failed separation | Control water, remove contaminated material as needed, reassess separation and structural depth, and rebuild in compacted lifts |
| Wheel ruts | Inadequate base, poor compaction, weak subgrade, deep loose surface, or loads exceeding the design | Investigate support and base depth instead of filling only the wheel tracks |
| Recurring potholes | Water collecting in a depression, loose repair material, or localized base failure | Restore drainage and profile, remove failed material, and rebuild the area |
| Washouts | Concentrated runoff, steep flow path, blocked drainage, or unstable outlet | Correct the water path and stabilize the outlet before replacing aggregate |
| Surface spreading | Loose or rounded gravel, turning traffic, slope, plowing, or inadequate containment | Regrade, reconsider surface material and depth, and add containment only where needed |
| Exposed fabric | Thin surface cover, aggregate migration, plow damage, or poor transition | Repair or protect the fabric and restore compatible aggregate cover |
Repair potholes from the bottom up
Do not repeatedly dump loose gravel into a wet depression. That treats the symptom while leaving the water trap or failed base intact.
For a more durable repair:
- Remove standing water.
- Remove loose, muddy, or contaminated material.
- Determine why water collects there.
- Restore the crown, cross-slope, or outlet.
- Repair failed base material where necessary.
- Add compatible, well-graded crushed aggregate in manageable layers.
- Overfill slightly where appropriate for final shaping.
- Compact each layer firmly.
- Reinspect the repair after rain.
Aggregate-supplier maintenance guidance similarly recommends removing water and loose material before placing and compacting well-graded crushed aggregate (SBS Concrete Aggregate Supplies).
Maintain the surface and drainage together
Use a landscape rake or grading equipment to redistribute displaced stone. Restore the intended drainage profile rather than merely smoothing wheel tracks. Clear ditches, swales, culvert ends, and outlets before blockage diverts water across the driveway.
Replenish the wearing course when it becomes thin, but do not cover unresolved potholes or soft areas with a new blanket of stone. Correct structural and drainage defects first.
Seek professional evaluation when:
- Washouts recur after ordinary storms
- The subgrade pumps or remains saturated
- Erosion threatens a road, building, slope, or neighboring property
- A new or larger culvert appears necessary
- Repair requires retaining work
- Major drainage changes would redirect or concentrate runoff
- Heavy-vehicle use exceeds the original design
Frequently Asked Questions
How deep should a gravel driveway be?
There is no universal depth. Published guidance ranges from 100–150 millimetres of total construction in one supplier example to 8–12 inches of excavation in a contractor example. Those figures represent different materials, soils, climates, traffic loads, and regional practices rather than one common specification (Beauxfort).
Set the depth according to subgrade strength, groundwater, drainage, freeze-thaw exposure, slope, aggregate gradation, expected traffic, controlling vehicle load, and available compaction equipment. Keep the wearing course controlled and place the necessary structural depth in the compacted base.
Do I need geotextile fabric under a gravel driveway?
Not always. Separation geotextile is most useful where clay, soft soil, or another susceptible subgrade is likely to mix with the aggregate. It may reduce soil migration and mud pumping.
Fabric cannot compensate for saturated ground, inadequate drainage, insufficient base depth, or poor compaction. It also does not prevent every weed because plants can establish in sediment and organic material accumulated above it.
If fabric is justified, select it for the soil, aggregate, equipment, and expected loads rather than choosing solely by weight or by a generic “weed membrane” label.
What type of gravel is best for the base and finished surface?
For the base, ask for durable, angular crushed aggregate suitable for mechanical compaction and the expected vehicle load. Dense-graded material containing fines can form a tight structural layer. Clean open-graded stone drains more freely through its voids but may require a different complete assembly.
For the finished surface, use stable aggregate compatible with the base and local conditions. Angular material generally interlocks better than rounded decorative gravel during braking and turning. Verify labels such as crusher run, road base, MOT Type 1, No. 304, No. 411, and No. 57 with the local supplier because their specifications are not identical everywhere.
How do I calculate how much gravel to order?
Calculate each layer separately:
Length × width × compacted depth = compacted volume
When using feet, convert depth to feet and divide cubic feet by 27 to obtain cubic yards. In metric units, dimensions measured in metres produce cubic metres.
Give the quarry the calculated compacted volume, selected material, and target compacted depth. The supplier should convert that figure to delivered volume or tonnage using product-specific density and compaction information.
Can I compact a driveway with a plate compactor, or do I need a roller?
A vibrating plate compactor is commonly used for modest residential areas and compatible thin lifts. A roller may be more practical for long driveways, large areas, coarse aggregate, or work expected to carry heavier vehicles.
Choose equipment according to aggregate size, gradation, lift thickness, project area, expected loads, and the machine’s operating specifications. Whichever machine is used, compact the full width with systematic overlapping passes. A firm appearance does not prove that a specified density has been achieved.
Construction-Day Checklist
- [ ] The applicable utility-location process has been completed.
- [ ] Private services and other known site features have been identified.
- [ ] Permit, entrance, culvert, stormwater, and association requirements have been checked.
- [ ] Driveway edges, curves, gates, and transitions are marked.
- [ ] Delivery trucks and construction equipment have suitable access.
- [ ] Spoil and stockpile locations are ready.
- [ ] Finished elevations and the drainage outlet are confirmed.
- [ ] Organic and visibly unstable material has been removed.
- [ ] The prepared subgrade preserves the planned crown or cross-slope.
- [ ] Saturated, pumping, or deeply yielding ground has been evaluated before proceeding.
- [ ] Separation geotextile is used only where justified and specified for the application.
- [ ] Structural aggregate will arrive in the correct sequence.
- [ ] Each compatible lift is graded and compacted before the next is placed.
- [ ] Depth, crown, cross-slope, transitions, and low spots are checked after every lift.
- [ ] The wearing course is controlled rather than left excessively deep and loose.
- [ ] Garage, gate, road, and drainage transitions are finished.
- [ ] Loose aggregate has been removed from adjacent public pavement.
- [ ] The completed driveway will be inspected during or immediately after rain.
The durable part of a gravel driveway is mostly out of sight. Careful subgrade preparation, drainage, structural aggregate placement, and lift-by-lift compaction matter more than decorative stone. If the soil, slope, runoff, or controlling vehicle load exceeds a straightforward residential project, obtain local excavation, drainage, geotechnical, or civil-engineering advice before continuing.