
Driveway Edging for Gravel: Materials, Drainage and Loads
Compare metal, concrete, stone, timber, plastic and open gravel shoulders for drainage, wheel loads, maintenance access and installation needs.
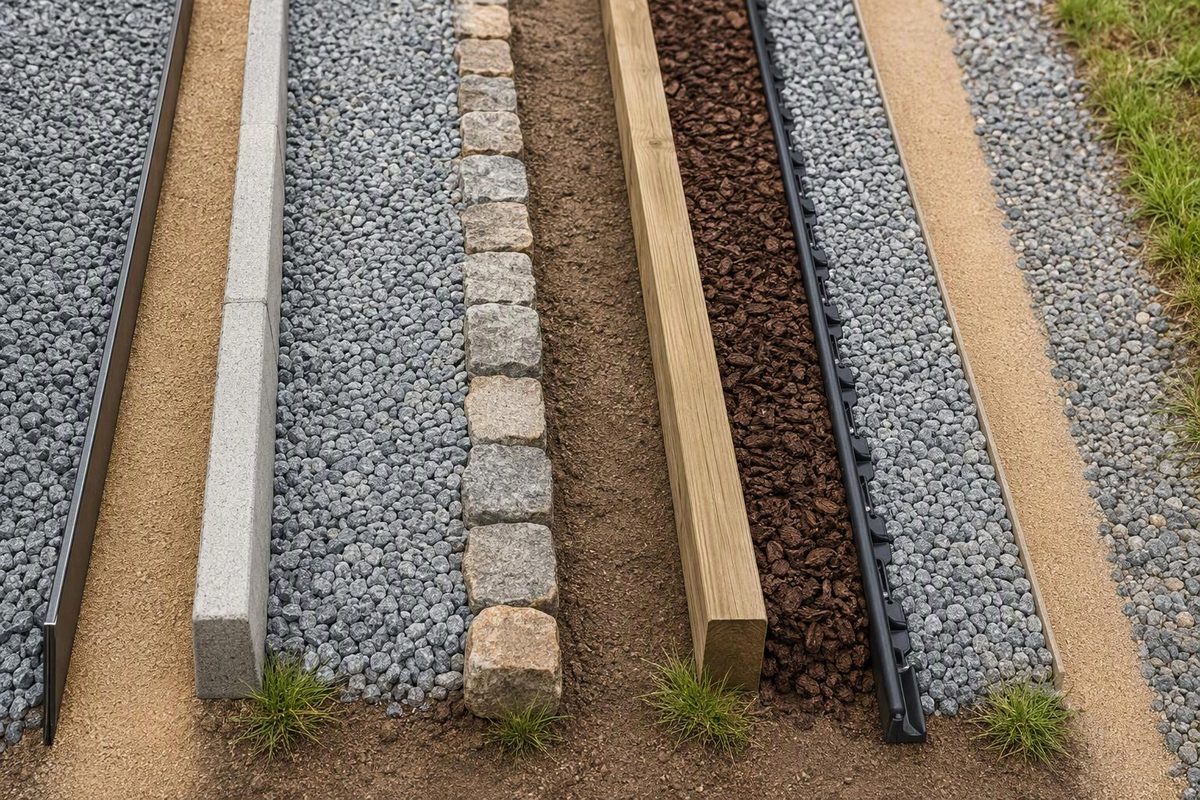
The best driveway edging for gravel depends on wheel contact, runoff and maintenance access. Use driveway-rated metal for a narrow edge that tires will not normally cross, concrete or supported stone for repeated wheel loads, and timber or rated composite outside the tire path. Leave long machine-graded sections uncurbed when an open shoulder provides better drainage and access.
Select the wheel, drainage and maintenance conditions at your driveway edge.
Gravel Edging Selector
Best starting point
Driveway-rated metal
Use steel or aluminum designed for gravel drives where tires do not normally cross the edge and runoff already has a clear route.
Where Each Option Fits
Source note: FHWA gravel-road guidance explains the drainage risk from high shoulders. Product examples are limited to the cited manufacturers: Sure-loc recommends 3/16- or 1/4-inch steel and 3/16-inch aluminum products from its range, while Straightcurve says its standard garden steel edging is not designed for vehicle crossings.
Match the Border to the Driveway
| Edging | Best Fit | Main Limitation |
|---|---|---|
| Heavy-gauge steel or aluminum | Straight or curved residential edges not normally crossed by tires | Garden-grade products may bend, lift or become a hazard if struck |
| Poured concrete curb | Parking pads, tight turns and edges exposed to frequent tire loads | Costly to alter; poor placement can trap runoff |
| Brick, cobble or natural stone | Visible entrances and parking areas | Labor-intensive; units can move without an adequate base and restraint |
| Ground-contact-rated timber | Informal drives with light edge loads | Deteriorates and can be displaced by tires or plowing equipment |
| Plastic or composite | Landscape boundaries outside the tire path | Many products are not designed as vehicle restraints |
| Compacted gravel shoulder | Long drives maintained with a tractor or grader | Less definition; displaced stone must be recovered periodically |
Material names alone do not establish capacity. Sure-loc recommends 3/16- or 1/4-inch steel and 3/16-inch aluminum products from its range for gravel drives. Straightcurve says its standard steel garden edging is not designed for vehicle crossings. These examples do not establish a universal minimum thickness: the profile, joints, anchors and foundation must suit the intended load (Sure-loc; Straightcurve).
Metal Works Best as a Thin, Protected Restraint
Driveway-rated steel or aluminum creates a narrow line that works on straight runs and curves. It is most appropriate where the border contains loose surface stone but does not routinely carry tires.
The specification must cover more than the strip’s thickness. Connections, stake design, spacing, soil support and finished height all affect whether the edge remains aligned. A flower-bed product should not be assumed suitable because it is made from the same metal as a driveway-rated system.
Keep exposed edges out of turning paths and confirm how the product terminates at entrances. A thin strip that bends or rises after impact can become a tire, plow or trip hazard.
Concrete and Supported Stone Handle Repeated Edge Loads
A poured curb or properly supported stone border is the stronger candidate where vehicles repeatedly approach or touch the edge, particularly around parking pads and tight turns. The base and restraint still matter: heavy units laid over weak or poorly compacted support can settle or spread.
Rigid borders are harder to alter after installation. Their elevation and alignment therefore need to follow the drainage plan rather than the lawn line alone. Where vehicles must cross, use a designed flush or load-rated transition instead of expecting raised landscape edging to function as a crossing.
Timber and Composite Belong Outside Regular Wheel Paths
Ground-contact-rated timber can provide an economical, replaceable border on an informal drive with light edge loads. It will deteriorate over time and may be shifted by tires, plows or grading equipment.
Plastic and composite systems are easy to curve, but many are intended only to separate landscape materials. Use one beside a driveway only when the selected system is rated for the expected application. A generic description such as “heavy duty” does not by itself establish that vehicles may strike or cross it.
Preserve the Drainage Path Before Containing Gravel
Edging can contain aggregate, but it cannot correct a flat surface, failed base or water running along the driveway. Diagnose those conditions with the gravel driveway repair guide, or address the full cross-section while laying a gravel driveway.
The FHWA’s gravel-road guide describes three connected elements: a crowned driving surface, a shoulder sloping away from it and a ditch. It warns that a high shoulder—also called a berm, curb or secondary ditch—blocks surface water from reaching the intended ditch. On level ground, trapped water can soak and soften the subgrade; on a grade, it can run along the edge and erode gravel (FHWA Gravel Roads Construction and Maintenance Guide).
That road guidance is not a universal residential-driveway specification, but the drainage mechanism applies. Determine where water leaves the gravel before installing a border.
- Identify the existing outlet. Preserve sheet flow to a lawn, swale or another stable discharge point.
- Check whether the border would become a dam. A continuous raised curb on the downhill side may require designed openings or a different drainage layout.
- Plan for concentrated discharge. Do not create an opening where water will scour soil, undermine the border or flow onto neighboring property.
- Separate containment problems from drainage failures. If water crosses the driveway or collects near a garage, compare swales, culverts, channel drains and catch basins in the driveway drain guide.
Set the edging high enough to contain the finished surface without blocking its planned runoff path. An unnecessarily tall lip is more likely to interfere with drainage, tires, snowplows and grading blades.
Keep Edging Clear of Tires, Plows and Graders
Mark actual wheel paths before selecting the edge. Include delivery trucks, trailer turns and the front-wheel swing when a vehicle backs out. At a frequently crossed location, install a curb or restraint designed for that traffic or provide a flush, load-rated transition.
Standard landscape edging is a poor substitute for a designed crossing. Even a stiff metal strip depends on its joints, anchors, foundation, surrounding material and soil. Straightcurve notes that no universal bar thickness or footing spacing suits every vehicle crossing because the complete assembly must carry the expected load (Straightcurve).
Maintenance equipment creates separate conflicts. A raised curb gives a plow or box blade something to catch. Decorative blocks make escaped gravel harder to recover, while a continuous rigid edge limits how far a grader can reshape the shoulder. Flush metal may be difficult to see under snow or vegetation.
For a long rural drive, edging only the entrance, parking pad or chronic spill areas can be more practical than bordering both sides end to end. A compacted, properly shaped gravel shoulder is easier to regrade and allows broad drainage, although it provides less visual definition and requires periodic recovery of displaced stone.
Install the Edging After Base and Drainage Repairs
- Confirm the finished line and width. Use string for straight runs and marking paint for curves, then check turning and parking movements.
- Locate underground utilities. In the US, contact 811 before trenching or driving stakes. The national service says shallow digging still requires a locate request because some utilities may be only inches below the surface (811 Before You Dig). Ask the local 811 center which owner-controlled or private lines are excluded and arrange any additional locating needed.
- Repair shape and soft spots first. Edging beside ruts or saturated support only conceals the underlying failure. The driveway gravel comparison explains why angular, well-graded material is a common traveled-surface choice.
- Prepare continuous support. Remove sod and loose organic soil, then compact the specified trench or aggregate support rather than bridging soft pockets.
- Install the complete specified system. Follow the selected product’s requirements for profile, connectors, anchors, spacing and substrate. Do not adapt flower-bed instructions to a driveway by guesswork.
- Set elevations from the drainage plan. Check low points and intended outlets before compacting gravel against the border.
- Test the result. Observe runoff during rain or a controlled water test. Correct ponding, erosion or border movement before completing the landscaping.
Edging should retain the surface course, not act as an improvised retaining wall for deep, unsupported fill.
Measure Runs and Compare Quotes by Linear Foot
A 100-foot driveway edged on both sides requires about 200 linear feet before entrance returns, curves or a parking pad. Measure those sections separately because they may need additional cuts, connectors or reinforced transitions.
A useful edging quote should identify:
- Linear feet of straight runs, curves and crossings
- Exact material, profile, thickness or unit size, and finish
- Finished height relative to the gravel
- Trench, compacted support, stakes, footing or haunching
- Joint, corner, end and entrance details
- Drainage openings and stable outlets
- Excavation and disposal
- Gravel replacement, reshaping and compaction
- Utility locating, permits and right-of-way restrictions
- Whether direct tire crossing is permitted by the product specification
A proposal that says only “install metal edging” is not detailed enough to compare. The appropriate border is the complete system that contains the chosen gravel, stays clear of unintended wheel loads and leaves the driveway’s drainage working.