
Permeable Paver Driveway Installation: Base, Drainage and Bid Checks
Check soil, stone layers, drainage, compaction and maintenance before installing a permeable paver driveway or comparing contractor bids.
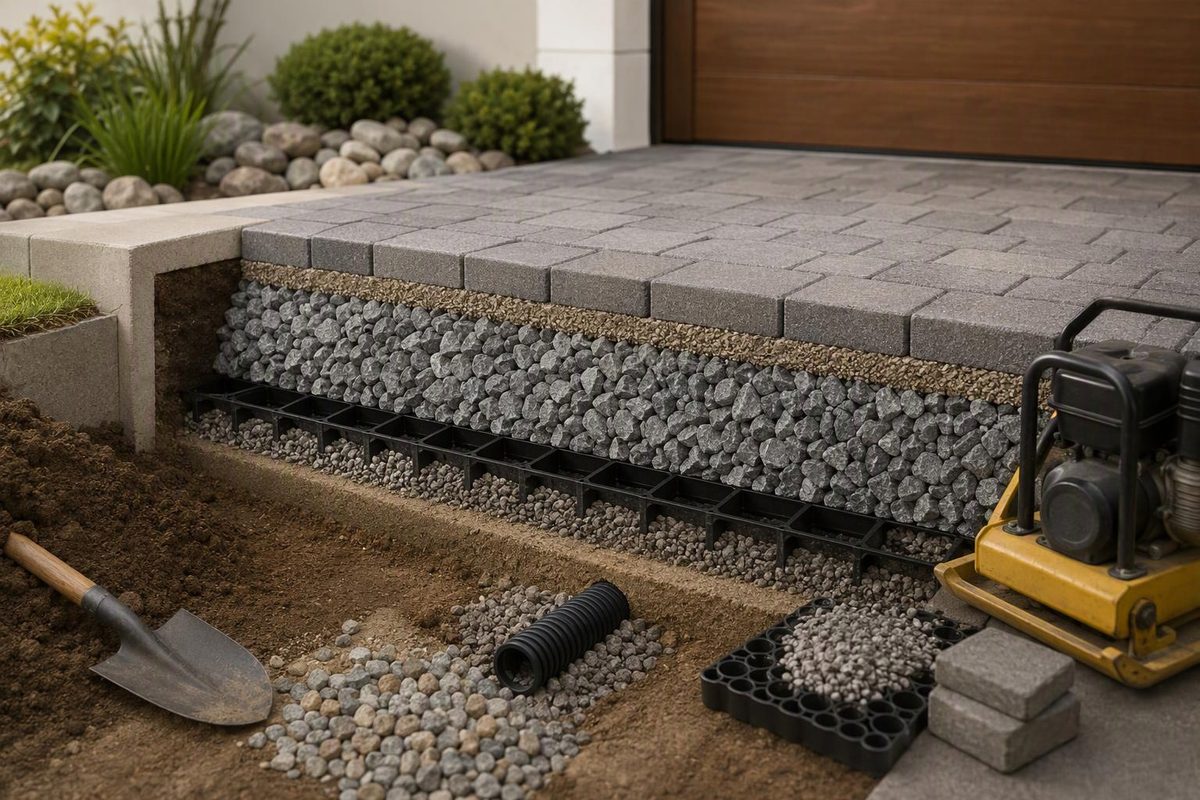
A permeable paver driveway is a drainage system beneath a paved surface—not just pavers with wider joints. For the permeable interlocking concrete pavers covered here, water passes through stone-filled joints into an open-graded aggregate reservoir, then either infiltrates the soil or leaves through a designed outlet. The concrete units themselves are solid. FHWA’s technical brief explains this distinction.
Before accepting a bid, require a cross-section showing the stone layers and a drainage plan showing where stored water and overflow will go. “Permeable pavers on gravel” is not enough detail to compare installations.
First decide whether water can infiltrate safely
The installer or designer needs to assess soil strength, field-tested infiltration, seasonal groundwater, underground utilities, driveway slope and nearby foundations. The design must also account for runoff arriving from roofs or adjoining pavement—not only rain falling directly on the driveway. FHWA’s design guidance calls for these checks.
There are three basic arrangements:
| Arrangement | What happens below the pavers | Where it fits |
|---|---|---|
| Full infiltration | Stored water soaks into the soil | Suitable, freely draining soils where infiltration is acceptable |
| Partial infiltration | Some water infiltrates; an underdrain removes excess | Lower-infiltration soils, including many silts and clays |
| No infiltration | A liner contains water; an outlet releases it | Sites where infiltration is unsuitable or must be prevented |
These are recognized CMHA system designs. Clay does not automatically rule out permeable pavers, but it can mean deeper stone, underdrains or a liner—not simply a different surface product.
High groundwater, expansive or disturbed fill soils, steep grades and foundations close to the reservoir deserve specific design attention. Muddy runoff is another warning sign: sediment can clog the joints. On a rural driveway, evaluate whether an adjoining gravel approach or exposed shoulder will continually deliver fines onto the permeable section. EPA identifies sediment loading and clogging as important limitations in its permeable pavement guidance.
Check local stormwater and driveway requirements before ordering materials. Do not assume the product automatically earns an impervious-area exemption or removes the need for an approved outlet. EPA’s guidance directs designers to follow state and local requirements. If the problem is concentrated runoff rather than rainfall on the driveway, compare other driveway drainage solutions before committing to a full replacement.
Specify the complete pavement section
A typical permeable interlocking concrete pavement section uses the following materials. These are U.S. technical-guide examples, not a universal driveway recipe:
| Component | Typical specification | What the bid must clarify |
|---|---|---|
| Pavers | Vehicular units typically at least 80 mm—about 3⅛ inches—thick | Exact product, thickness and driveway suitability |
| Joints | Angular ASTM No. 8, 89 or 9 aggregate | Aggregate matched to the paver’s joint openings |
| Bedding | Typically 2 inches of open-graded No. 8 stone | Placement thickness and finished elevations |
| Base reservoir | Typically No. 57 stone; often a 4-inch layer above a separate subbase | Required finished depth and compaction |
| Subbase reservoir | Typically larger No. 2, 3 or 4 stone | Depth determined by traffic and water storage |
These examples come from CMHA’s construction guide, revised in 2022. Some residential driveways omit a separate subbase and use a thicker base instead. That does not make four inches of stone a complete driveway foundation. The design checks both structural support and stormwater storage, then uses the thicker required section.
Do not substitute dense-graded crusher run, ordinary bedding sand or conventional polymeric joint sand for this specified open-graded, stone-jointed section. The drainage path depends on the open spaces between the aggregates. Any alternative needs approval for the particular permeable system. See our paver base material guide for the distinction between dense- and open-graded bases.
Fabric also needs a defined purpose. Side separation helps keep adjacent soil out of the reservoir; a horizontal geotextile beneath it requires appropriate selection for filtration and clogging risk. A geotextile is not the same as an impermeable liner. FHWA explains their different roles.
Installation sequence—and where shortcuts matter
- Locate utilities and establish elevations. Mark excavation limits, garage and street transitions, drainage outlets and overflow routes. Keep muddy runoff and dirty equipment away from the work.
- Excavate and prepare the soil according to the design. Do not automatically compact it as though this were an ordinary paver driveway. Compaction can reduce infiltration, although some weak soils need it for structural support; the drainage design must account for that choice.
- Install specified fabric, liners and drainage pipes. Confirm outlet elevations and access for inspection or cleaning before covering them.
- Place and compact the reservoir stone in controlled lifts. CMHA describes subbase lifts up to six inches using suitable equipment; smaller compactors can require thinner lifts. Open-graded stone still needs compaction.
- Provide a driveway-rated edge restraint. Its anchorage must suit the base. CMHA’s residential plastic or metal edging option uses a compacted dense-graded perimeter berm—not spikes relying on loose reservoir stone.
- Screed bedding, lay pavers and fill joints. Keep traffic off the screeded bed. Fill joints with the specified stone, sweep loose aggregate off the surface, compact the pavers, then top up settled joints.
These steps follow CMHA’s construction guidance. Ask to see the excavation, drains and completed reservoir before bedding conceals them. Keep photographs and delivery records.
Permeable pavers need no concrete curing period, but open the driveway only after compaction, joint filling and final acceptance are complete.
Compare the scope before the square-foot price
Request separate quantities or prices for demolition, excavation and disposal; each stone layer; pavers and cuts; edging; geotextiles or liners; underdrains and outlets; testing; and restoration of disturbed landscaping.
Depth changes the job substantially. For an illustrative 600-square-foot driveway, adding four inches of reservoir depth adds:
600 × (4 ÷ 12) ÷ 27 = 7.4 cubic yards of finished aggregate volume.
It also adds excavation and hauling. This is geometry, not a recommended depth or a delivered loose-stone quantity. A cheaper bid may simply omit that work. EPA notes that poor infiltration, greater storage requirements and added drainage components can increase installation costs. Its cost discussion supports comparing complete site scopes rather than surface prices.
Include testing and maintenance in the handover
Specify final elevation and surface checks, outlet verification and a surface infiltration test, with an acceptance rate set in the project specifications. FHWA identifies ASTM C1781 for permeable unit pavement testing. Include a six-month contractor visit to inspect and replenish joint stone. FHWA’s acceptance checklist covers both testing and the return visit.
Plan to inspect once or twice yearly, preferably after rain; remove sediment with suitable vacuum equipment; replenish joint aggregate; and keep outlets clear. Avoid winter traction sand, and keep plowed-snow piles off the permeable surface. These are part of FHWA’s maintenance guidance—and part of the ownership cost, not optional extras.